Troubleshoot Network
Networking and the Vista Controller
While the Vesta controller does not require Internet access to function, it is helpful for several reasons:
- Setting and maintaining the accuracy of the system clock
- Reporting network data to enable the 'Get IP Address' function on the VECS web site
- Uploading and installing updates
- Enabling external access (so that you can view system performance from your cell phone, for instance)
- Enabling remote troubleshooting and support
If it's at all possible, Internet access is preferred. Usually this is as simple as installing a standard Ethernet cable from your Cable/DSL modem or router to the Vesta controller.
Network Considerations
In most cases, the Vesta controller is preconfigured for your network before delivery. To connect with it, simply plug it in, turn it on, and type its IP address into the URL bar of your favorite web browser (Chrome, Firefox, Safari, Internet Explorer...). The default IP address for most networks is 192.168.1.8, but it may be different in your situation. Look on the configuration sheet included with your controller.
Minimal Network Requirements
In order to program the Vesta controller or view any data, you must at a minimum have a computer networked to the controller. This can be accomplished with a crossover cable as described in the section on configuring your PC to access the Vesta controller.
Can't Connect to Vesta Controller
If you can't connect to the Vesta controller at all, there are only a few possible reasons:
- You're using the wrong IP address
- The Vesta controller is configured for a different network
- The network cable is defective
- There is a network problem
- The Vesta controller is damaged
1: Wrong IP address
The Vesta should have been configured with an IP address that is appropriate for your network. That IP address should have been included with the documentation provided with your shipment. Make sure that you've typed it correctly in your browser's URL bar. You may also try the 'Internal IP Address' link on this page. You'll need your controller's serial number.
If this doesn't work, then pursue the possibilities below.
2: Configured for different network
Check the IP address of any computer on your network as described here. If the first three digits of the computer's IP address don't match the first three digits of the Vesta controller's IP address, then you'll need to configure a computer to match the Vesta controller's network settings and then update the Vesta controller to match your network. Detailed instructions are provided below.
3: Defective network cable
Check the other end of the network cable that's connected to the Vesta controller. Does it show blinking lights indicating activity? If not, the cable is likely defective. Try another cable, or try plugging the cable into a different port if possible.
4: Network problem
It's possible that there's a problem with the network itself - a router that needs to be rebooted, or an address conflict. Most of these problems are outside the scope of this document. If you have reason to think that there may be another device at the same address, unplug the Vesta controller and try the steps in 'Finding an Unused IP Address' below.
5: Vesta controller is damaged
Make sure that the controller has power. In the as-delivered configuration, one of the green LEDs on the cover will be illuminated. In any configuration, the LED in the power switch (on the right side) should be illuminated. If this isn't the case, check the power supply connections and make sure that the power supply is plugged into a live outlet.
There is a fuse inside the controller. Remove the cover (four screws, one on each corner). With the power on, there should be two bright green LEDs illuminated on the power distribution board - smaller green circuit board with fuse. If these aren't illuminated, replace the fuse with a 1 amp fast-blow fuse.
If this doesn't solve the problem, contact Vermont Energy Control Systems for further assistance.
Configuring for a Different Network
For the rest of this example, we'll assume that the first three numbers of the IP didn't match - for instance, the network is 192.168.0.x, and the Vesta controller is set up with an IP address of 192.168.1.8.
Finding an Unused IP Address
Now it's necessary to find an unused IP address on your network. In general, addresses where the last number is between 5 and 49 are more likely to be available. A quick (but not absolutely definitive) test is to use ping to test an address and see if there's a response. Continuing with this example we might try 192.168.0.6 as a prospective address for the Vesta controller. In the command prompt window, try the command 'ping 192.168.0.6'. If you're lucky, you'll get a few 'Request timed out' messages, indicating that there's likely no computer at that address. If you get a response, try another address such as 192.168.0.7.
In this example, the addresses in the network are all 192.168.1.x. This is a common value, and is the default for networks with a Linksys router. Other common address ranges are 192.168.0.x and 10.0.0.x. Whatever the address block that's in use on your network, you'll need to find an unused IP address in that block. Once you have an unused address, write it down. We'll need it in the 'Changing Vesta Network Settings' section below.
Now, follow the process described here to obtain additional network information. You'll need a gateway address and at least one DNS server address.
Once you have the required network information, follow the process below to gain access to the Vesta controller so that you can change it to match your network.
Configuring a PC to access the Vesta controller

Once you have the network information and an unused IP address, it's time to connect to the Vesta controller. If there's a network connection between the PC and the Vesta controller, then you're ready. If not, the easiest way to do that is to get a 'crossover' network cable and connect a PC directly to the Vesta controller. A crossover cable can be purchased at any computer or office supply retailer.
Once connected, you'll need to manually configure TCP/IP networking on the PC. The details vary, but the basic idea is that you need to give your PC an IP address where the first three numbers match the IP address of the Vesta controller. Since the Vesta controller is at 192.168.0.20 in this example, we'll set up the PC to be at 192.168.0.100. The address doesn't matter as long as the first three numbers match. The last number has to be between 1 and 254.
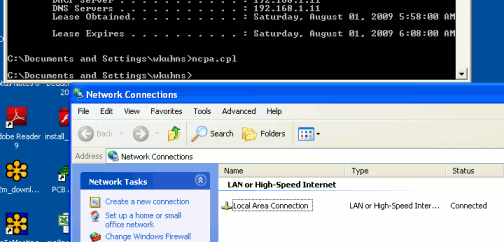
If you're running Windows, bring up the 'Network Connections' window. That might be a choice from the Start menu or the control panel. You might also be able to get it by typing 'ncpa.cpl' at the command prompt.
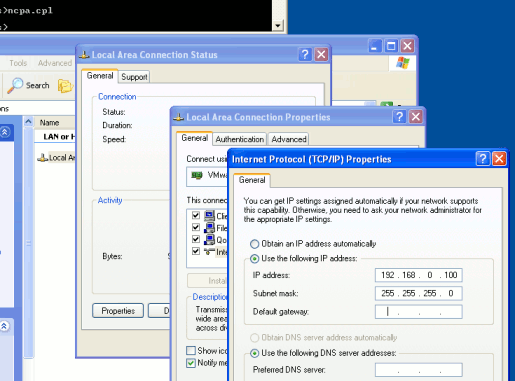
Once you have the Network Connections window, double click on the 'Local Area Connection' item. This will bring up another window. In that window, click Properties. That will bring up another window. In that window, select Internet Protocol (TCP/IP), then click Properties, which will bring up yet another window. In that window, click the button for 'Use the following IP address'. Fill in the IP address with the number you've selected in the process above. In this example we're using 192.168.0.100. Also fill in 255.255.255.0 for the subnet mask as shown. None of the other information is needed at this step.
In each window, in reverse order, click 'OK' or 'Close'. Depending on the version of Windows, you may need to restart your computer for the changes to take effect. As above, type 'ipconfig /all' to verify your network settings.
The sequence described above applies to only one variant of Windows. It's beyond the scope of this document to cover all the differences in how and where network configuration is accomplished in Windows. Hopefully this will provide enough guidance.
Once you have your PC configured for the same IP address block as the Vesta controller, you should be able to bring up a web browser and type in the Vesta controller address. If this still does not bring up the Vesta controller web interface, then you have a problem which is outside the scope of this document.
Changing the Vesta Network Settings

At this point you should have all the new network information that you need, and you should be able to access the Vesta controller. Follow the directions here to change the Vesta controller network settings.
Once the Vesta controller has been configured, you'll need to return your PC to its original network settings. Follow the process above on the PC, but click 'Obtain an IP address automatically'. Restart your PC and you should be able to access your Vesta controller at its new address.


